Stash busting seems to acutally be working. I am knitting up a storm. I have completed 2 sweaters for me (one green, set in sleeves in the round, sweater using EZ's percentages and Spun out 21; a second lovely red set in sleeves in the round, adapted from Wendy Knits). I have most of a third one on the needles, and part of number four....
Knitting is happening here. Amazing.
Pictures...?
Did someone say pictures??
Oh, well, hmmmm
19 February 2007

9 February 2007
Once a month, whether I need to or not...
I actually write a blog entry. Since I am trying to do way too many things, this can be a challenge.
Today, I am wearing my handmade cream sweater, made from the leftovers of my knitting olympic challenge. I finished my very first set in sleeve sweater in the round last week--that was WAY cool to do, as I have never cut a steek before (nerve wracking, ladies, nerve wracking!).
I am participating in a number of groups at work (groups aimed at spending money; groups aimed at making the transitions between grades and schools easier in a second language, groups just for the sake of groups), as well as updating my own, and my two school's websites. Needless to say, knitting and actually taking the pictures and posting them is turning into a challenge.
So,
Here is my work website:
http://chatt.hdsb.ca/~olahwinfielde
There are a number of great knitting links on the knitting page. Check it out.
Today, I am wearing my handmade cream sweater, made from the leftovers of my knitting olympic challenge. I finished my very first set in sleeve sweater in the round last week--that was WAY cool to do, as I have never cut a steek before (nerve wracking, ladies, nerve wracking!).
I am participating in a number of groups at work (groups aimed at spending money; groups aimed at making the transitions between grades and schools easier in a second language, groups just for the sake of groups), as well as updating my own, and my two school's websites. Needless to say, knitting and actually taking the pictures and posting them is turning into a challenge.
So,
Here is my work website:
http://chatt.hdsb.ca/~olahwinfielde
There are a number of great knitting links on the knitting page. Check it out.
9 January 2007
This has been a busy week, getting back to school and realizing that no, contrary to my firm belief, I apparently had NOT put the plans for the week in my day book before I left school on the Friday before Christmas. Needless to say, life has not been quite as smooth as I had wished (but it is going well). The kids are ajusting to the changes, and mostly they did their homework for me over the break: try something new. Notice the difference: TRY, not do it perfectly, but try it. It might not work smoothly (like the child who 'played dead' after a car went by--not something he will try again, and certainly not what he expected would happen!), but then again, you might actually like salmon for dinner!
In the interest of trying something new, here is a simple lace edging for the Striper Stash Busters:
Cast on 10 sts.
row 1, and all odd rows: knit all sts.
row 2: k2, yo, k2tog, yo, knit to end.
row 4: k2, yo, k2tog, yo, knit to end.
row 6: k2, yo, k2tog, yo, k2tog, yo, knit to end.
row 8: k2, yo, k2tog, yo, k2tog, yo, knit to end.
row 10: cast off first 4 sts, knit to end (10 sts remaining)
row 12: knit (This is the spot to change colours of yarn, if you want to do a pattern, or just use up the stash for knitting).
My blocks needed 8 repeats per strip, and 9 repeats per block of 80 rows, plus one on each end for neatness. These will be put on like quilt block edgings: first the short ends, then the long sides, after having been knit separately.
You can, of course, cast on more, or less (although, I don't think less than 6 sts cast on will give you a nice edging to keep the blanket from rolling in). I think I will try it, for fun.
In the interest of trying something new, here is a simple lace edging for the Striper Stash Busters:
Cast on 10 sts.
row 1, and all odd rows: knit all sts.
row 2: k2, yo, k2tog, yo, knit to end.
row 4: k2, yo, k2tog, yo, knit to end.
row 6: k2, yo, k2tog, yo, k2tog, yo, knit to end.
row 8: k2, yo, k2tog, yo, k2tog, yo, knit to end.
row 10: cast off first 4 sts, knit to end (10 sts remaining)
row 12: knit (This is the spot to change colours of yarn, if you want to do a pattern, or just use up the stash for knitting).
My blocks needed 8 repeats per strip, and 9 repeats per block of 80 rows, plus one on each end for neatness. These will be put on like quilt block edgings: first the short ends, then the long sides, after having been knit separately.
You can, of course, cast on more, or less (although, I don't think less than 6 sts cast on will give you a nice edging to keep the blanket from rolling in). I think I will try it, for fun.
1 January 2007
Happy New Year's Day
Happy New Year! We rang out the old and in the new with a party at a friend's house, and visiting my father in law in the hospital.
My father in law had a 'minor' stroke Friday (although he is a lot better) and will be in the hospital for a while. Is any stroke a minor stroke? The funniest part of this, in my opinion, is that he now speaks French better than he speaks English (and he didn't speak French a lot before this!). But, he can communicate, he can eat, and he is beginning to move around. So, be thankful for small blessings.
Today is New Year's day, and the first day that I propose to not go shopping (except for essentials, of course, like food). I can't even include sock wool, since I have a large bucket full. So, in the interest of surviving this new year, I will be joining the Knit from my stash group, from Wendy Knits...
Check it out here:
http://wendyknits.net/stash2007.htm
My father in law had a 'minor' stroke Friday (although he is a lot better) and will be in the hospital for a while. Is any stroke a minor stroke? The funniest part of this, in my opinion, is that he now speaks French better than he speaks English (and he didn't speak French a lot before this!). But, he can communicate, he can eat, and he is beginning to move around. So, be thankful for small blessings.
Today is New Year's day, and the first day that I propose to not go shopping (except for essentials, of course, like food). I can't even include sock wool, since I have a large bucket full. So, in the interest of surviving this new year, I will be joining the Knit from my stash group, from Wendy Knits...
Check it out here:
http://wendyknits.net/stash2007.htm
30 December 2006
Stash Buster Striped Blankets
I got a copy of Sally Melville's Styles, and thought I would take her advice about sorting by colour... 14 large buckets later (and I don't think we found all the bags of wool around), I made the decision to create a pattern for something that would use a LOT of stash up, quickly. Really quickly. I mean--really! So, using some of the ideas from Styles, mostly about picking 3 adjacent colours on the colour wheel, and the handy knitting machine, I came up with a basic knitted blanket.
Knitted Blanket
On the knitting machine, I use a setting of 10 (gauge roughly 4 sts to the inch), cast on 60 sts, and knit 400 rows. Change colours every 10 rows; this can be done as blocks of colour with 4 dark and 4 light strips in each block. Knit 6 strips, sew them or slip stitch crochet them together. Block. Decide that you need an edging. Start drinking Reisling (or Rickard's red, or other beveredge) while you think about what edging you should use...garter stitch, not more than 10 sts wide, preferably something that will be easy to change colours on a regular basis.
The first blanket is red, purple and blue. I sewed it together with mattress stitch. By strip 3, I was definitely thinging that there must be a better (faster, easier) way to do this--maybe slip stitch crochet. I didn't know how to knit in the ends, so it will take approximately 17 years to sew in all the ends. They stick between your toes in your sleep, and drive me bananas. I may just decide to line it with fleece, so that Nicole doesn't whine for years.
Blanket 2 for daugher two, Patricia, was made with blues and greens and purples. I figured out how to knit in the ends as you go--much better, although some of the backs slipped to the front, and created a speckled edge along one side. This one has a crochet edging, which I don't think is the best choice, but I love the colours, and I love the pattern. .
Blanket 3 is all wool, and only 4 strips wide. I changed the pattern so that there are blocks of colour: 4 dark and 4 light strips of each 'colour way' to 400 rows (5 blocks of colour). Slip stitch crochet together, and this one will have a garter stitch edging. 3 strips sewn together so far; this one only has 4 strips, as it is for the sofa.
The plan is:
pinks, purples, whites (one for each of the twins, and one for my goddaughter)
green, blue, grey, and purples (2 youngest nephews)
red, purple, blues (oldest nephew, and godson)
whites, greys, yellows and greens (husband, our bed)
amish (read this as as loud as possible, rainbow colours (one sister)
romantic colours (pinks, reds and blues) (Mother, youngest sister)
Knitted Blanket
On the knitting machine, I use a setting of 10 (gauge roughly 4 sts to the inch), cast on 60 sts, and knit 400 rows. Change colours every 10 rows; this can be done as blocks of colour with 4 dark and 4 light strips in each block. Knit 6 strips, sew them or slip stitch crochet them together. Block. Decide that you need an edging. Start drinking Reisling (or Rickard's red, or other beveredge) while you think about what edging you should use...garter stitch, not more than 10 sts wide, preferably something that will be easy to change colours on a regular basis.
The first blanket is red, purple and blue. I sewed it together with mattress stitch. By strip 3, I was definitely thinging that there must be a better (faster, easier) way to do this--maybe slip stitch crochet. I didn't know how to knit in the ends, so it will take approximately 17 years to sew in all the ends. They stick between your toes in your sleep, and drive me bananas. I may just decide to line it with fleece, so that Nicole doesn't whine for years.
Blanket 2 for daugher two, Patricia, was made with blues and greens and purples. I figured out how to knit in the ends as you go--much better, although some of the backs slipped to the front, and created a speckled edge along one side. This one has a crochet edging, which I don't think is the best choice, but I love the colours, and I love the pattern. .
Blanket 3 is all wool, and only 4 strips wide. I changed the pattern so that there are blocks of colour: 4 dark and 4 light strips of each 'colour way' to 400 rows (5 blocks of colour). Slip stitch crochet together, and this one will have a garter stitch edging. 3 strips sewn together so far; this one only has 4 strips, as it is for the sofa.
The plan is:
pinks, purples, whites (one for each of the twins, and one for my goddaughter)
green, blue, grey, and purples (2 youngest nephews)
red, purple, blues (oldest nephew, and godson)
whites, greys, yellows and greens (husband, our bed)
amish (read this as as loud as possible, rainbow colours (one sister)
romantic colours (pinks, reds and blues) (Mother, youngest sister)
Knitting for Christmas, and beyond
This is another hats post (I really do love the hats pattern--it is so flexible, and easy).
This one is done with two strands of worsted weight yarn, on 8mm needles. Cast on 30 sts. Create wedges by knitting to 22 sts, then turning around and knitting back; knit to 23 sts, and knit back, and so on until all the sts are used up. Continue until 5 wedges have been made--and then check your size. You may need another full wedge, you may not. If you don't, then cast off and sew together.
My niece walked in while my nephew was trying one on, and said: Awesome hat--where did you get it, and can I have one? (all in one breath, no pause!).
These are fast, and easy, and really good stash reducers.
This one is done with two strands of worsted weight yarn, on 8mm needles. Cast on 30 sts. Create wedges by knitting to 22 sts, then turning around and knitting back; knit to 23 sts, and knit back, and so on until all the sts are used up. Continue until 5 wedges have been made--and then check your size. You may need another full wedge, you may not. If you don't, then cast off and sew together.
My niece walked in while my nephew was trying one on, and said: Awesome hat--where did you get it, and can I have one? (all in one breath, no pause!).
These are fast, and easy, and really good stash reducers.
29 December 2006
Baby Surprise, Preemie Sized
This is a collection my ramblings on trying to create a preemie sized baby sweater based on the Baby Surprise Sweater by Elizabeth Zimmerman. The original was published in Knitter's Magazine (first in issue 14, then reprinted in issue 41, both of which I own), as well as in Knitters Workshop, and The Opinionated Knitter. This is an origami type of knitting pattern--knit all in one piece, with only the shoulder seams to sew.
I played with the proportions using the desired guage, desired size, and the adult version, published in The Opinionated Knitter, to get a preemie size sweater that would be easy to knit and not have any seams in any uncomfortable places. The magic is in the folding; to discover how to fold it, please purchase one of the patterns. An inexpensive reprint of the original is available from Schoolhouse Press; or, you can go the more fun way and purchase The Opinionated Knitter that contains both the adult and baby versions, along with a lot more interesting stuff that is worth owning. (Both Knitters magazines are out of print, sad to say.) I can say that, without the pattern, I could not figure out how to fold it! Really, please respect the copyright issues and purchase a copy of the original. You won't regret it!
A note: this was developed as a charity knitting pattern, and cannot be sold for profit; the original copyright for the concept belongs to Schoolhouse Press, and Elizabeth Zimmerman; this pattern is copyrighted to me. If you do use my pattern variation, your 'cost' of use is a sweater knit for charity.
Baby Surprise, Preemie size
guage 6sts, 6 ridges to 1 inch (although, as EZ says, babies come smaller and larger, so play with it) using baby sport weight/sport weight wool and 3.5 mm needles. This makes roughly a 3-5 lb preemie sized sweater, about 11" in circumference.
The sweater is knit first from cuffs to elbows in two pieces, and then joined by the cast on that runs across the top of the shoulder. Markers are placed at each point; these become the decrease points, that run from elbow to the underarm along the back of the sleeve, and then the increase points that run from underarm to about belly button across the front. Length is added by knitting back and forth along this center section, and then the entire outer edge is knit up with a garter st border. In keeping with EZ's original idea, button holes are placed on both outside edges. This sweater is more fun when you change colours with abandon, and is a good way to use up your stash.
Sleeves: (make 2) Cast on 22 sts. Knit 3 ridges (6 rows).
Increase row: k3, *m1, k4 * end m1 k3
Knit until there are 8 ridges, in total.
Join: knit across first sleeve (rs), pm, cast on 55 sts, pm, knit across second sleeve.
next row (and all wrong side rows) knit.
Decreases:
(rs) Knit, decrease 1 st on each side of marker, knit, decrease 1 st on each side of marker, knit. (In the original, this is an sk2, which I found harder to keep in a straight line).
Next row, (and all ws rows): knit.
Repeat for 11 decreases. There should be 33 sts between markers, which is roughly the width of the back.
Increases:
(rs): knit to marker, m1, sm, k1, m1, knit to second marker and m1, sm, k1, m1, knit to end.
next row (ws): knit across.
Repeat increase rows until 9 ridges have been worked.
Note: EZ added increases about the 3rd ridge down across the back to provide fullness for the diaper, about every 7th sts.
Neck: Next two rows, while maintaining the increases on the public side, bind off 4 sts at each neck edge.
Next 4 rows, while maintaining increases on the public side, bind off 2 sts at each neck edge.
Work until there are 64 sts between markers.
To lengthen the sweater, work on the center 64 sts only until 8 ridges have been worked.
Border: (rs), work across center 64 sts, pm, pick up 8 sts along the lengthened edge (1 between each ridge), work sts placed on hold (center front).
Next row: (ws): work back, sm, work across center 64 sts, pm, pick up 8 sts along lengthened edge (1 between each ridge), work sts placed on hold for center front.
Work for 2 ridges total.
(ws): K3, *yo, k2tog, k5*, end yo, k2 tog, k3, m1, sm, k1, m1, knit to marker, m1, sm, k1, m1, k3, *k2 tog, yo, k5*, end k2 tog, yo, k3.
K2 more ridges. Bind off.
Fold and sew shoulder seams with a flat seam. (This is most amazing form of knitting orgami I have seen!). Sew buttons on left for a girl, or buttons on right for a boy.
Variations:
Any texture that has a 'square' ratio for knitting will work for this pattern. I have used a variation of two colour knitting, varying garter, seed st. and double seed st. in the stripes, with colour changes on both the public and private sides. As long as you maintain the decreases in the correct placement, and end the final edges with garter st, it looks very cool.
Enjoy, and knit a couple for a preemie near you!
I played with the proportions using the desired guage, desired size, and the adult version, published in The Opinionated Knitter, to get a preemie size sweater that would be easy to knit and not have any seams in any uncomfortable places. The magic is in the folding; to discover how to fold it, please purchase one of the patterns. An inexpensive reprint of the original is available from Schoolhouse Press; or, you can go the more fun way and purchase The Opinionated Knitter that contains both the adult and baby versions, along with a lot more interesting stuff that is worth owning. (Both Knitters magazines are out of print, sad to say.) I can say that, without the pattern, I could not figure out how to fold it! Really, please respect the copyright issues and purchase a copy of the original. You won't regret it!
A note: this was developed as a charity knitting pattern, and cannot be sold for profit; the original copyright for the concept belongs to Schoolhouse Press, and Elizabeth Zimmerman; this pattern is copyrighted to me. If you do use my pattern variation, your 'cost' of use is a sweater knit for charity.
Baby Surprise, Preemie size
guage 6sts, 6 ridges to 1 inch (although, as EZ says, babies come smaller and larger, so play with it) using baby sport weight/sport weight wool and 3.5 mm needles. This makes roughly a 3-5 lb preemie sized sweater, about 11" in circumference.
The sweater is knit first from cuffs to elbows in two pieces, and then joined by the cast on that runs across the top of the shoulder. Markers are placed at each point; these become the decrease points, that run from elbow to the underarm along the back of the sleeve, and then the increase points that run from underarm to about belly button across the front. Length is added by knitting back and forth along this center section, and then the entire outer edge is knit up with a garter st border. In keeping with EZ's original idea, button holes are placed on both outside edges. This sweater is more fun when you change colours with abandon, and is a good way to use up your stash.
Sleeves: (make 2) Cast on 22 sts. Knit 3 ridges (6 rows).
Increase row: k3, *m1, k4 * end m1 k3
Knit until there are 8 ridges, in total.
Join: knit across first sleeve (rs), pm, cast on 55 sts, pm, knit across second sleeve.
next row (and all wrong side rows) knit.
Decreases:
(rs) Knit, decrease 1 st on each side of marker, knit, decrease 1 st on each side of marker, knit. (In the original, this is an sk2, which I found harder to keep in a straight line).
Next row, (and all ws rows): knit.
Repeat for 11 decreases. There should be 33 sts between markers, which is roughly the width of the back.
Increases:
(rs): knit to marker, m1, sm, k1, m1, knit to second marker and m1, sm, k1, m1, knit to end.
next row (ws): knit across.
Repeat increase rows until 9 ridges have been worked.
Note: EZ added increases about the 3rd ridge down across the back to provide fullness for the diaper, about every 7th sts.
Neck: Next two rows, while maintaining the increases on the public side, bind off 4 sts at each neck edge.
Next 4 rows, while maintaining increases on the public side, bind off 2 sts at each neck edge.
Work until there are 64 sts between markers.
To lengthen the sweater, work on the center 64 sts only until 8 ridges have been worked.
Border: (rs), work across center 64 sts, pm, pick up 8 sts along the lengthened edge (1 between each ridge), work sts placed on hold (center front).
Next row: (ws): work back, sm, work across center 64 sts, pm, pick up 8 sts along lengthened edge (1 between each ridge), work sts placed on hold for center front.
Work for 2 ridges total.
(ws): K3, *yo, k2tog, k5*, end yo, k2 tog, k3, m1, sm, k1, m1, knit to marker, m1, sm, k1, m1, k3, *k2 tog, yo, k5*, end k2 tog, yo, k3.
K2 more ridges. Bind off.
Fold and sew shoulder seams with a flat seam. (This is most amazing form of knitting orgami I have seen!). Sew buttons on left for a girl, or buttons on right for a boy.
Variations:
Any texture that has a 'square' ratio for knitting will work for this pattern. I have used a variation of two colour knitting, varying garter, seed st. and double seed st. in the stripes, with colour changes on both the public and private sides. As long as you maintain the decreases in the correct placement, and end the final edges with garter st, it looks very cool.
Enjoy, and knit a couple for a preemie near you!
21 June 2006
Hats, again
Just like Dad's favourite, I thought it would be fun to make a little watch cap style preemie hat. This is just like the k2 p2 wonders, only scaled down a lot. The ribbing lets it fit a lot of different babies, and it is fun and easy to make.
Enjoy.
Size: small (fits an orange) medium (fits a large apple), newborn
3.5 mm needles (double points or one long circular), small amount of sports weight wool.
Cast on 36 (40, 48) sts. Join, k2 p2 around row. Continue until hat is 5 1/2 (6, 6 1/2) inches in length, to decreases.
Decrease round 1: k2, p2 tog, around round.
Continue K2, p1 for 4 rounds.
K1, p2 tog around round.
K1 p1 for two rounds.
K2 tog around rounds until 10 sts remain. Cut yarn and sew through remaining sts, pulling the hole tight. Sew in ends. Fold up cuff.
This one is fun to use up lots of stash wool, since stripes are so much fun!
Just like Dad's favourite, I thought it would be fun to make a little watch cap style preemie hat. This is just like the k2 p2 wonders, only scaled down a lot. The ribbing lets it fit a lot of different babies, and it is fun and easy to make.
Enjoy.
Size: small (fits an orange) medium (fits a large apple), newborn
3.5 mm needles (double points or one long circular), small amount of sports weight wool.
Cast on 36 (40, 48) sts. Join, k2 p2 around row. Continue until hat is 5 1/2 (6, 6 1/2) inches in length, to decreases.
Decrease round 1: k2, p2 tog, around round.
Continue K2, p1 for 4 rounds.
K1, p2 tog around round.
K1 p1 for two rounds.
K2 tog around rounds until 10 sts remain. Cut yarn and sew through remaining sts, pulling the hole tight. Sew in ends. Fold up cuff.
This one is fun to use up lots of stash wool, since stripes are so much fun!
5 April 2006
Hats, hats, hats
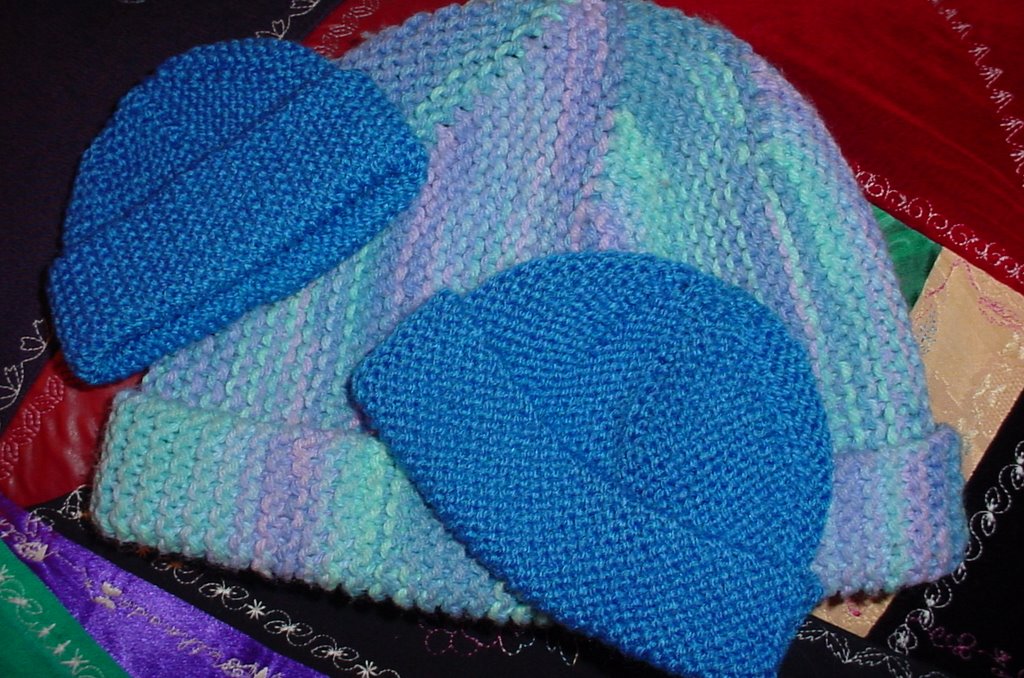
Garter Stitch Hats
I have been experimenting with a variation of a garter stitch hat, similar to the cloche in Knitting for Babies, and the garter stitch hat in Knitty Magazine (made for a man, in 8 sections with colour changes each row) . I wanted something thatwas very easy, and could be knit by my students at our elementary school in Knitting club. What I came up with is a short-rowed garter stitch hat. The hat is worked sideways, and seamed at the back. A lot of patterns like this use 7 or 8 wedges; I liked 6 wedges better.
The number of rows knit determines the circumference of the hat. The number of rows in the wedge corresponds to the number of sts left unworked at the beginning of the wedge: fewer stitches (rows) means a smaller hat. The straight knitting portion turns into the body and turn up of the hat. The garter stitch does not need to be wrapped, so it is an easy way to start short row shaping. And, the bonus, the kids at school all like the hat, and it is actually flattering without being really tight on the head. My oldest, who hates hats, loves this one.
The big version:
Hat: Child's small (2-4); medium (6-8); teen; adult.
Worsted Weight wool; 5 mm needles. Guage roughly 5 sts to the inch.
The pale blue hat shown in the picture is the teen size.
Cast on 40 (40; 40; 45) sts. Knit to end of row.
Wedge one:Knit 32 (30; 28; 31) sts, leaving 8 (10; 12; 14) sts unworked.
Turn;knit back.
Next row: Knit 33 (31; 29; 32) sts, leaving 7 (9; 11; 13) sts unworked.
Turn and work to end of row.
Next row: Knit 34 (32; 30; 33) sts, leaving 6 (8; 10; 12) sts unworked.
Turn and knit to end of row.
Continue pattern, knitting one more stitch in the short row section every time before turning, until all stitches are worked. This completes one wedge of the hat. Continue working wedge pattern until 6 wedges have been worked in total. Hat should have 48 (60; 72; 86) ridges. Bind off all stitches. Sew up seam, gathering up the top stitches and sewing through them.
You can change colours in each section by knitting the first complete row (from crown to outer edge) with the new colour.
The Preemie version:
3.5 mm needles, sports weight or baby sports weight wool
makes approx. a 2lb (4-5 lb, 6-8 lb) baby size hat. Guage is 6 sts to the inch, and 6 rows to the inch, using baby sport. The 2 lb and 5 lb size are shown in the picture.
This hat is made with six wedge sections, knit sideways in garter st.
Cast on 30 (33, 36) sts.
First wedge section:
Knit 22 (23, 24) sts, leaving 8 (10, 12) unworked on needle. Turn, and knit back.
Knit 23 (24, 25) sts, leaving 7 (9, 11) sts unworked on needle. Turn and knit back.
Continue working wedge, by knitting one st beyond sts already worked until all sts are used.
You can change colours by knitting the last row of the wedge in the new colour.
Work until 6 wedges have been completed (48, 60, 72 ridges in all). Bind off all sts. Sew with a flat seam.
17 March 2006
Oh, the things we will do when avoiding .....

marking
house cleaning
work
sewing
mending
laundry
.....
It started, of course, with a KAL. March's second KAL for the dishclothknitting group. The cloth was one I recognized, although I had never knit it. Round, doily-ish, and just plain fun. After two days, being the impatient soul I am, I raced ahead (despite the disaproval of the teenage daughter) and knit the whole thing. Lovely.
Then, feeling guilty, I started a second one--and finished it, because it was way too fun. Of course, I had to go to the store and pick up a second ball of the yarn because one ball was 5 yards too short to finish the cloth. Then I started a third one, which is still on day two's KAL...
The pattern for the round cloth is here:
http://www.knittingknonsense.com/lacyround.html
Then, I got to thinking...
What if I played with the lace? What if I tried to knit a tea towel for the stove with the same/kind of the same lace edging? What if I didn't want it so gatherered? What about something like a cool hand towel for the bath room? Wouldn't it be neat to make something pretty.
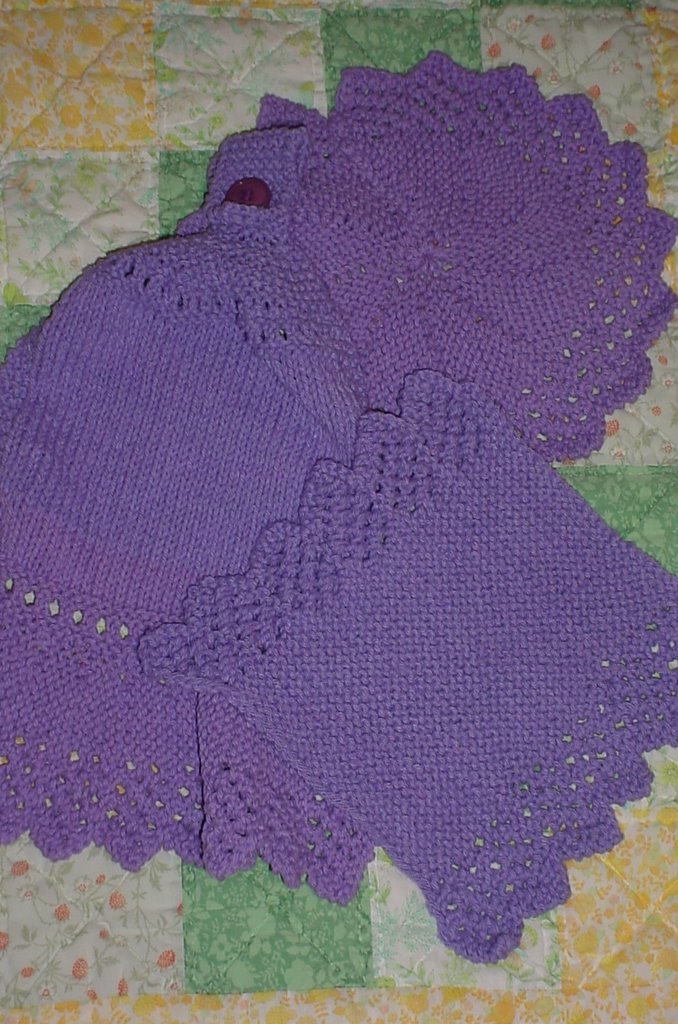 Kitchen Tea set.
This set includes a Button top hand towel, a square dish cloth, and a larger hand towel. The round cloth is copyrighted to the link mentioned above.
These are all made of worsted weight cotton yarn, on size 6 (4 mm) needles, although you can use size 7 (4.5 mm) needles.
I used two 85 g balls of Lily peaches and cream to make the 3 pieces.
 Button top kitchen towel:
There are two choices of edging on this hand towel, a ruffled edge, and a straight edging. The length of the edging on this towel creates the width of the towel. The body of the towel is then picked up across the top of the edging and knit to the desired depth before the button band and tab.
Ruffled Edging:
Cast on 15 sts.
row 1: k2, * yo, k2 tog * twice, yo, k to end.
row 2: sl 1, knit to end
row 3: k2, *yo, k2 tog * twice, yo, k to end
row 4: sl 1, knit to end
row 5: k2, *yo, k2 tog * 3 times, yo, k7, turn
row 6: knit to end
row 7: k2, *yo k2 tog * 3 times, yo, k7, turn
row 8: knit to end
row 9: bind off 4 sts, knit to end
row 10: sl1, knit to end.
Repeat these 10 rows for 12 points, or desired width of tea towel, measured along straight edge. Bind off all sts except the last one. Pick up 3 sts for each repeat (total of 38 sts across).
Straight Edging:
Cast on 12 sts.
row 1: k2, * yo, k2 tog * twice, yo, k to end.
row 2, and all wrong side rows: sl 1, knit to end
row 3: k2, *yo, k2 tog * twice, yo, k to end
row 5: k2, *yo, k2 tog * 3 times, yo, k7, turn
row 7: k2, *yo k2 tog * 3 times, yo, k7, turn
row 9: bind off 4 sts, knit to end
row 11: k2, *yo, k2 tog * twice, knit to end
Repeat these 12 rows for 8 points, or desired width of tea towel, and then bind off all sts except the last one. Pick up 5 sts for each repeat, total of 40 sts across. Decrease to 38 sts in first knit row of eyelet row.
Eyelet edging: This is optional, but it makes the cloth look pretty, and you can thread a ribbon through it for a totally lacy look.
row 1: knit across
row 2: knit across (right side)
row 3: knit across
row 4: k3, *yo, k2 tog * across row to last 3 sts, k3
row 5: knit across
row 6: knit across
row 7: knit across
Body of towel:
row 1: (right side) knit
row 2: (wrong side), k3, purl to last 3 sts, k3.
repeat rows 1 and 2 for 6 inches above the border, or until desired depth has been reached, ending with a right side row.
Repeat eyelets pattern if desired.
Top of kitchen towel (button band)
row 1: (right side) k3, *k2 tog * to last 3 sts, k3
row 2: knit
row 3, 4, 5, and 6: knit across
row 7: k3, * k2 tog * to last 3 sts, k3
row 8, 9, 10, 11 and 12: knit
row 13: k 2, * k2 tog* to last 2 sts, k2
row 14: knit
row 15: k2, k2 tog, k2, k2 tog, k2 (8 sts total).
row 16: knit
Continue knitting on these 8 sts for 17 ridges (34 rows total) or desired length to button hole.
For Button hole:
row 1: k2, k2 tog, wrap yarn around needle twice, k2 tog, k2
row 2: k 3, knit into each wrap of the needle once (creates 2 sts), k 3
row 3: knit across
row 4: knit acros
row 5: k 2, k2 tog, k2, k2 tog, k2
row 6: knit across
row 7: k2, * k2 tog * twice, k2
row 8: knit across
row 9: k1, * k2 tog * twice, k1
row 10: knit across
row 11: bind off all sts.
Sew on button just above the last gather before the tap.

Face cloth, or tea towel.
The edging is knit on either side of this flat cloth. For a wash cloth, cast on 36 sts. For a medium tea towel, cast on 80 sts. For a larger cloth, cast on 100 sts.
row 1 and 2: k2, * yo, k2 tog * twice, yo, knit to end
row 3 and 4: k2, * yo, k2 tog * twice, yo, knit to end
row 5 and 6: k2, * yo, k2 tog * three times, yo, knit to end
row 7 and 8: k2, * yo, k2 tog * three times, yo, knit to end
row 9 and 10: bind off 4 sts, knit to end.
row 11 and 12: k2, *yo, k2 tog * twice, knit to end
Repeat these 12 rows until towel is desired width. Bind off.
My face cloth was 6 repeats.
Subscribe to:
Posts (Atom)